FoldX
Run the FoldX
In this example, I am using the 7ekb as example
|
RepairPDB
Why Repair PDB?
According to ChatGPT4o, RepairPDB command in FoldX is a crucial step to ensure the quality and integrity of your PDB file before performing stability calculations or other analyses. Also, you could found more information from document
-
Fix Structural Issues:
- Correcting Errors: PDB files obtained from experiments like X-ray crystallography or cryo-EM often have missing atoms, residues, or other structural issues that can affect downstream analyses.
RepairPDBfixes these issues to ensure a complete and accurate structure. - Adding Missing Atoms: The command can add missing atoms, such as hydrogen atoms, which are essential for energy calculations.
- Correcting Errors: PDB files obtained from experiments like X-ray crystallography or cryo-EM often have missing atoms, residues, or other structural issues that can affect downstream analyses.
-
Standardizing the Structure:
- Normalization:
RepairPDBstandardizes the structure to ensure that all residues and atoms are in the correct format and positions. This includes correcting bond lengths and angles to standard values. - Removing Non-standard Residues: It can remove or correct non-standard residues and ligands that might interfere with calculations.
- Normalization:
-
Improving Energy Calculations:
- Optimizing Geometry: The command optimizes the geometry of the protein, ensuring that the atomic positions are energetically favorable. This leads to more accurate stability and free energy calculations.
- Minimizing Steric Clashes: It identifies and resolves steric clashes (where atoms are too close to each other), which can distort energy calculations.
-
Ensuring Compatibility:
- Consistency: Running
RepairPDBensures that your PDB file is compatible with FoldX’s algorithms, reducing the risk of errors during subsequent steps.
- Consistency: Running
How does the Output looks like?
Residue LYSH222 has high Energy, we mutate it to itself
Repair Residue ID= LYSH222

BackHbond       =               -317.22
SideHbond       =               -137.87
Energy_VdW      =               -476.42
Electro         =               -15.23
Energy_SolvP    =               628.80
Energy_SolvH    =               -624.90
Energy_vdwclash =               15.60
energy_torsion  =               9.33
backbone_vdwclash=              143.43
Entropy_sidec   =               245.04
Entropy_mainc   =               632.72
water bonds     =               0.00
helix dipole    =               -0.35
loop_entropy    =               0.00
cis_bond        =               4.50
disulfide       =               -13.95
kn electrostatic=               -0.25
partial covalent interactions = 0.00
Energy_Ionisation =             1.07
Entropy Complex =               0.00
-----------------------------------------------------------
Total          = 				  -49.10
It took me 2m 48s. It only work in single thread and cannot move on multiple threads. I guess because it works by following the order of the AA and the Total is depending on the previous values. So, it can’t work on multiple threads.
Here is the result of before and after repairing. The RMS=0.01 which means it almost the same. But the slightly different are mainly focus on the loos area. In the picture present below, the left panel with green structure is the raw pdb file from PDB database. The light blue structure on the right is the corrected by FoldX. Red structure is antigen. As I marked on the left panel, 2 beta-sheets and 1 alpha helix are deleted and become random loop. Those area from the antibody are very closing to the antigen. So, technically, random loop would make more sense to me.

Stability Calculations
After repaired the PDB file, you can get the result immediately.
   ********************************************
   ***                                      ***
   ***             FoldX 5.1 (c)            ***
   ***                                      ***
   ***     code by the FoldX Consortium     ***
   ***                                      ***
   ***     Jesper Borg, Frederic Rousseau   ***
   ***    Joost Schymkowitz, Luis Serrano   ***
   ***    Peter Vanhee, Erik Verschueren    ***
   ***     Lies Baeten, Javier Delgado      ***
   ***       and Francois Stricher          ***
   *** and any other of the 9! permutations ***
   ***   based on an original concept by    ***
   ***   Raphael Guerois and Luis Serrano   ***
   ********************************************

Stability >>>

1 models read: 7ekb_Repair.pdb

BackHbond       =               -332.04
SideHbond       =               -163.29
Energy_VdW      =               -481.14
Electro         =               -17.42
Energy_SolvP    =               626.91
Energy_SolvH    =               -633.28
Energy_vdwclash =               13.20
energy_torsion  =               9.65
backbone_vdwclash=              144.57
Entropy_sidec   =               259.27
Entropy_mainc   =               634.24
water bonds     =               0.00
helix dipole    =               -0.40
loop_entropy    =               0.00
cis_bond        =               4.50
disulfide       =               -13.95
kn electrostatic=               -0.41
partial covalent interactions = 0.00
Energy_Ionisation =             1.14
Entropy Complex =               0.00
-----------------------------------------------------------
Total          = 				  -93.01

FINISHING STABILITY ANALYSIS OPTION

Your file run OK
End time of FoldX: Sat Jul  6 17:23:18 2024
Total time spend: 0.85 seconds.
Mutation Energy Change Calculation (BuildModel)
With FoldX, you can predicted the mutations effects when you have the wild type structure. And you could also swap the residues by this way. The command BuildModel could generate the new pdb structure with the ‘mutant_file’ you write. According to the document, you can using 2 types of configure format and they should start as mutant_file or individual_list. In the example individual_list below, make sure each mutation sets are ended with ; and separate by ,. No spaces are allowed.
Here is an example of mutant configure file:
AA4P,FD4P;
AA4F,QD4F;
In this example, it would generate 2 new structures. For the first one, in chain A, the mutation is A4P, in chain D, the mutation is F4P. The “;” means the first mutate process is done. It would read the second line to create the another mutation file. You don’t need to calculate the mutation energy difference between before and after again. Because all they are saved in the file (*.fxout) as tsv format.
For running it, you just need to run like:
|
An interesting thing is for the mutate-file, it has to start with “individual_list” or ‘mutate_file’ or you’ll get error. After the job is down, you’ll got 4 outputs: “Average_.fxout", "Dif_.fxout”, “PdbList_.fxout", and "Raw_.fxout”. Here is some details about those outputs:
-
Average_*.fxout:
- This file contains the average energy values from multiple runs of the BuildModel command. FoldX often performs multiple simulations to generate an average value to improve reliability and account for variability in the calculations.
- It includes averaged energy terms like van der Waals interactions, electrostatics, solvation, and total energy for the mutated model.
-
Dif_*.fxout:
- This file contains the differences in energy values between the wild-type and mutated proteins.
- It shows the ΔΔG (difference in free energy change) due to the introduced mutation(s), which helps in understanding the stability change caused by the mutation.
-
PdbList_*.fxout:
- This file lists the PDB files generated during the mutation process.
- It includes the names of the mutated PDB files that FoldX generated, which you can further analyze or visualize using molecular visualization tools.
-
Raw_*.fxout:
- This file contains the raw energy values for each individual run of the BuildModel command.
- It provides detailed energy components for each simulation, such as van der Waals interactions, electrostatics, solvation, and other energy terms for the mutated model.
Notice
- For the
mutate_file, you can't add any extra expressions like space in it. - According to the PDB document, the SEQRES and ATOM records may include only a portion of the molecule. So if your sequence was extracted from the PDB file, the numbering of it may incorrect. For achieve the correct position, you may like to extract extract the sequence from cif format.
BuildModel in Action
Here, the test data is from Qi Wen Teo[1] CR9114 (4FQI) as example. I randomly choose 4FQI as the standard. In the paper, they mutated the resi through 93 to 102 (kabat numbering) which is 97 to 110. So, we could do it with a mutate_file. For FoldX, it only recognize the digital numbering. But in antibody (show below) sometimes was numbered by kabat numbering or something similar methods. So it may contain numbering like 100A, 100B, etc. They can’t recognized by FoldX and we need to renumbering them. Pymol is very complicated in this kind of task. But Biopython could handle it very well. You could using the script from Karobben/Bio_tools with code: python PDBreNumbering.py -i 4FQI_Repair.pdb -o renumbered.pdb
ATOM   4942  CD1 TYR H 100     -17.095  54.149 -23.690  1.00 17.83      C    C
ATOM   4943  CD2 TYR H 100     -15.503  54.016 -21.927  1.00 17.51      C    C
ATOM   4944  CE1 TYR H 100     -16.055  54.246 -24.606  1.00 18.76      C    C
ATOM   4945  CE2 TYR H 100     -14.431  54.115 -22.848  1.00 20.56      C    C
ATOM   4946  CZ  TYR H 100     -14.740  54.248 -24.173  1.00 21.30      C    C
ATOM   4947  OH  TYR H 100     -13.735  54.378 -25.146  1.00 22.06      C    O
ATOM   4948  N   TYR H 100A    -19.396  56.114 -18.971  1.00 19.55      C    N
ATOM   4949  CA  TYR H 100A    -20.277  56.072 -17.797  1.00 21.40      C    C
ATOM   4950  C   TYR H 100A    -21.609  56.741 -18.067  1.00 25.46      C    C
ATOM   4951  O   TYR H 100A    -22.655  56.288 -17.527  1.00 25.98      C    O
ATOM   4952  CB  TYR H 100A    -19.611  56.821 -16.587  1.00 18.28      C    C
ATOM   4953  CG  TYR H 100A    -18.192  56.412 -16.276  1.00 19.12      C    C
ATOM   4954  CD1 TYR H 100A    -17.753  55.092 -16.396  1.00 21.46      C    C
Script to create the mutate_file. In this script, the target region is from number 97-110 and the sequence is “ARHGNYYYYSGMDV”.
|
|
After that, the result is saved in the file Raw_renumbered.fxout. The table was started at line 9. We could use R to sorting and compare the experiment result. For the experiment result, you can download from nicwulab/CR9114_LC_CDRH3_screen
|
 |
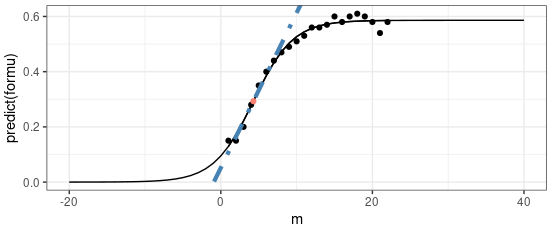
 |
According to this plot, the correlation between experiments and the prediction is terrible. I think the main reason is because all those positions are located on CDRH3 region which not only they are random loop, but also the key site to determine the binding affinity of the antibody. So, the prediction result would be extrimly hard. But I think the result is not totally useless. At least when the Δ G of the complex predicted became more stable ($\Delta_ {mutate} - \Delta_ {wt} < 0$), most of experiments results are very closing to the wild type.
| Mute | WT | Anno | Diff | log10_K |
|---|---|---|---|---|
| -111.068 | -110.525 | D109E | -0.543 | -9.444906 |
| -110.702 | -110.512 | D109Q | -0.190 | -9.422508 |
| -110.532 | -110.525 | D109C | -0.007 | -9.343902 |
| -111.447 | -110.503 | D109M | -0.944 | -9.296702 |
| -112.243 | -110.512 | G100M | -1.731 | -9.222573 |
| -111.185 | -110.503 | D109T | -0.682 | -9.180450 |
| -110.902 | -110.857 | S106M | -0.045 | -9.170053 |
| -111.330 | -110.525 | D109R | -0.805 | -9.156767 |
| -112.243 | -110.504 | D109Y | -1.739 | -9.136677 |
| -111.697 | -110.893 | G100I | 0.804 | -9.114074 |
| -112.226 | -110.512 | G100K | -1.714 | -9.100179 |
| -111.195 | -110.525 | G100C | -0.670 | -9.075721 |
| -113.282 | -110.512 | G100R | -2.770 | -9.057495 |
| -111.521 | -111.362 | Y104F | -0.159 | -9.040850 |
| -110.971 | -110.611 | G107F | -0.360 | -9.038579 |
| -111.158 | -110.503 | D109F | -0.655 | -9.028260 |
| -110.824 | -110.503 | D109L | -0.321 | -9.026410 |
| -112.106 | -110.820 | G100N | -1.286 | -8.995671 |
| -111.164 | -110.470 | V110L | -0.694 | -8.978111 |
| -111.718 | -110.818 | G100H | -0.900 | -8.869666 |
| -111.044 | -110.873 | S106N | -0.171 | -8.545155 |
| -110.944 | -110.837 | N101H | -0.107 | -8.423659 |
How it work?
Here is the corrected version of your text:
According to the documentation: This is the workhorse of the FoldX mutation engine. This command ensures that whenever you are mutating a protein, you always move the same neighbors in the WT and in the mutant, producing for each mutant PDB a corresponding PDB for its WT. Each mutation will move different neighbors, and therefore you need different WT references.
From the experience above, I think it works under the assumption that the structure of the protein won’t change due to the point mutation. As shown below, even though the amino acid changed from Y to R, the position remains unchanged, and the RMSD is 0. So, I think it would be more reliable when this amino acid is in the alpha helix or beta sheet. When a point mutation happens in these regions, the rough structure remains relatively the same. However, when the mutation occurs in the loop region, the result would be less reliable. According to Yuan M, et al.[2], when the mutation only happens in the V gene of the antibody, the correct ratio was about 70%. But according to the test above, the result is inconsistent and lacks convinciveness.

Interface Analysis
|
- Indiv_energies_4FQI_Repair_AC:
This file contains individual energy contributions of residues to the overall stability of the protein complex. To be notice, the total energy of the complex is not equals to the sum of individual total energy. - Interaction_4FQI_Repair_AC:
It records detailed interaction between each chain pairs. I think Interaction Energy is one of most important results from it. - Summary_4FQI_Repair_AC.fxout:
It contains only a few important columns from the Interaction_4FQI_Repair_AC.fxout. - Interface_Residues_4FQI_Repair_AC.fxout:
It records all residues in the interface in a list.
Notice
Before running AnalyseComplex, you should renumber the residues as well. Residue numbers like 100A and 100B in an antibody can both be shown as 100, leading to multiple entries like YH100 in the list. After renumbering the whole PDB with the script above, the results would become "YH103, YH104, YH105".
Additionally, the Interface_residues results may contain some unusual entries such as oA11. Technically, this means that in chain A, position 11, there is a non-typical residue, such as a Zn ion.
Teo Q W, Wang Y, Lv H, et al. Stringent and complex sequence constraints of an IGHV1-69 broadly neutralizing antibody to influenza HA stem[J]. Cell reports, 2023, 42(11). ↩︎
Yuan M, Feng Z, Lv H, et al. Widespread impact of immunoglobulin V-gene allelic polymorphisms on antibody reactivity[J]. Cell Reports, 2023, 42(10). ↩︎