python: python=3.7.5 is strongly recommended!!
If you wants to know why, go to check This blog
So, if you want to write an app for windows, linux, IOS, and Android with only one set of code, then, Kivy is the best choice for you.
Hello World
first, you’d like to import kivy and from kivy.app import App;
Then, you’d like from kivy.uix.label import Label so you can add some text
Add kivy.require("1.10.1") to assign the version of the kivy. (PS: actually, mine is 1.11.1)
Then, we can start to class a class EpicApp(App)
import kivy
from kivy.app import App
from kivy.uix.label import Label # so you can add some text

kviy.require("1.10.1") # Assign the version of the kivy so every body would be on the same page


class EpicApp(App):
    ''' After class, we'd like to initializing the App'''
    def build(self):
      return Label(text="Hello world")

if __name__ == "__main__":
  EpicApp().run()
So, it’ll be your first kivy app!
It is not interesting at all, actually. So, Let’s move one for GridLayout
GridLayout
Now, let’s add from kivy.uix.gridlayout import GridLayout to import the Layout style for organizing sort of things; from kivy.uix.textinput import TextInput to add a TextInput box.
Now, Our class are becoming more complicated
So, during the initiation in build section, we not return to a simple text Label anymore. Let’s say, to return to a class named ConnectPage.
And let’s sorting stuff in ConnectPage by GridLayout
import kivy from kivy.app import App from kivy.uix.label import Label from kivy.uix.gridlayout import GridLayout # one of many layout structures from kivy.uix.textinput import TextInput # allow for ...text input.
kivy.require("1.10.1")
## An actual app is likely to consist of many different ## "pages" or "screens." Inherit from GridLayout class ConnectPage(GridLayout): # runs on initialization def __init__(self, **kwargs): # we want to run __init__ of both ConnectPage AAAAND GridLayout super().__init__(**kwargs)
self.cols = 2 # used for our grid
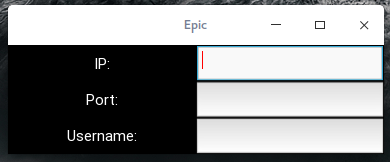
# widgets added in order, so mind the order. self.add_widget(Label(text='IP:')) # widget #1, top left self.ip = TextInput(multiline=False) # defining self.ip... self.add_widget(self.ip) # widget #2, top right
class EpicApp(App): def build(self): return ConnectPage()
if __name__ == "__main__": EpicApp().run()
And that is what will we get! Awesome, hum?
Lesson3
import socket import errno from threading import Thread
HEADER_LENGTH = 10 client_socket = None
## Connects to the server defconnect(ip, port, my_username, error_callback):
global client_socket
# Create a socket # socket.AF_INET - address family, IPv4, some otehr possible are AF_INET6, AF_BLUETOOTH, AF_UNIX # socket.SOCK_STREAM - TCP, conection-based, socket.SOCK_DGRAM - UDP, connectionless, datagrams, socket.SOCK_RAW - raw IP packets client_socket = socket.socket(socket.AF_INET, socket.SOCK_STREAM)
try: # Connect to a given ip and port client_socket.connect((ip, port)) except Exception as e: # Connection error error_callback('Connection error: {}'.format(str(e))) returnFalse
# Prepare username and header and send them # We need to encode username to bytes, then count number of bytes and prepare header of fixed size, that we encode to bytes as well username = my_username.encode('utf-8') username_header = f"{len(username):<{HEADER_LENGTH}}".encode('utf-8') client_socket.send(username_header + username)
returnTrue
## Sends a message to the server defsend(message): # Encode message to bytes, prepare header and convert to bytes, like for username above, then send message = message.encode('utf-8') message_header = f"{len(message):<{HEADER_LENGTH}}".encode('utf-8') client_socket.send(message_header + message)
## Starts listening function in a thread ## incoming_message_callback - callback to be called when new message arrives ## error_callback - callback to be called on error defstart_listening(incoming_message_callback, error_callback): Thread(target=listen, args=(incoming_message_callback, error_callback), daemon=True).start()
## Listens for incomming messages deflisten(incoming_message_callback, error_callback): whileTrue:
try: # Now we want to loop over received messages (there might be more than one) and print them whileTrue:
# Receive our "header" containing username length, it's size is defined and constant username_header = client_socket.recv(HEADER_LENGTH)
# If we received no data, server gracefully closed a connection, for example using socket.close() or socket.shutdown(socket.SHUT_RDWR) ifnotlen(username_header): error_callback('Connection closed by the server')
# Convert header to int value username_length = int(username_header.decode('utf-8').strip())
# Receive and decode username username = client_socket.recv(username_length).decode('utf-8')
# Now do the same for message (as we received username, we received whole message, there's no need to check if it has any length) message_header = client_socket.recv(HEADER_LENGTH) message_length = int(message_header.decode('utf-8').strip()) message = client_socket.recv(message_length).decode('utf-8')